In this chapter, we guide you how to use mails with grommunio Web. After reading through this chapter, you should be able to read, send and organize your e-mails.
Mail Shortcut Bar
Section titled “Mail Shortcut Bar”Located at the top left of the Mail module is the Mail Shortcut Bar.
The Mail Shortcut Bar provides quick access to common actions such as:
- Creating a new message
- Opening the Address Book
- Refreshing the view
- Printing an email
- Changing the layout (No Preview, Right Preview, Bottom Preview)
These functions allow fast interaction with the most frequently used mail features.
Mail reading
Section titled “Mail reading”By default, the main content area in the mail interface is split into three parts. In the left pane, the folder navigation area is visible. Right next to the folder navigation area is the folder list area which lists all mails from the particularly selected folder from the folder navigation area. Selecting an e-mail from the folder automatically opens the e-mail in the main window area, showing the e-mail effectively.
Mail sending
Section titled “Mail sending”To compose a new mail, choose the highlighted New Email button from the main shortcut bar or click on the + symbol at the end of the Tab Bar. Pressing one of these buttons will open a new mail tab with an empty ready-to-write-mail interface.
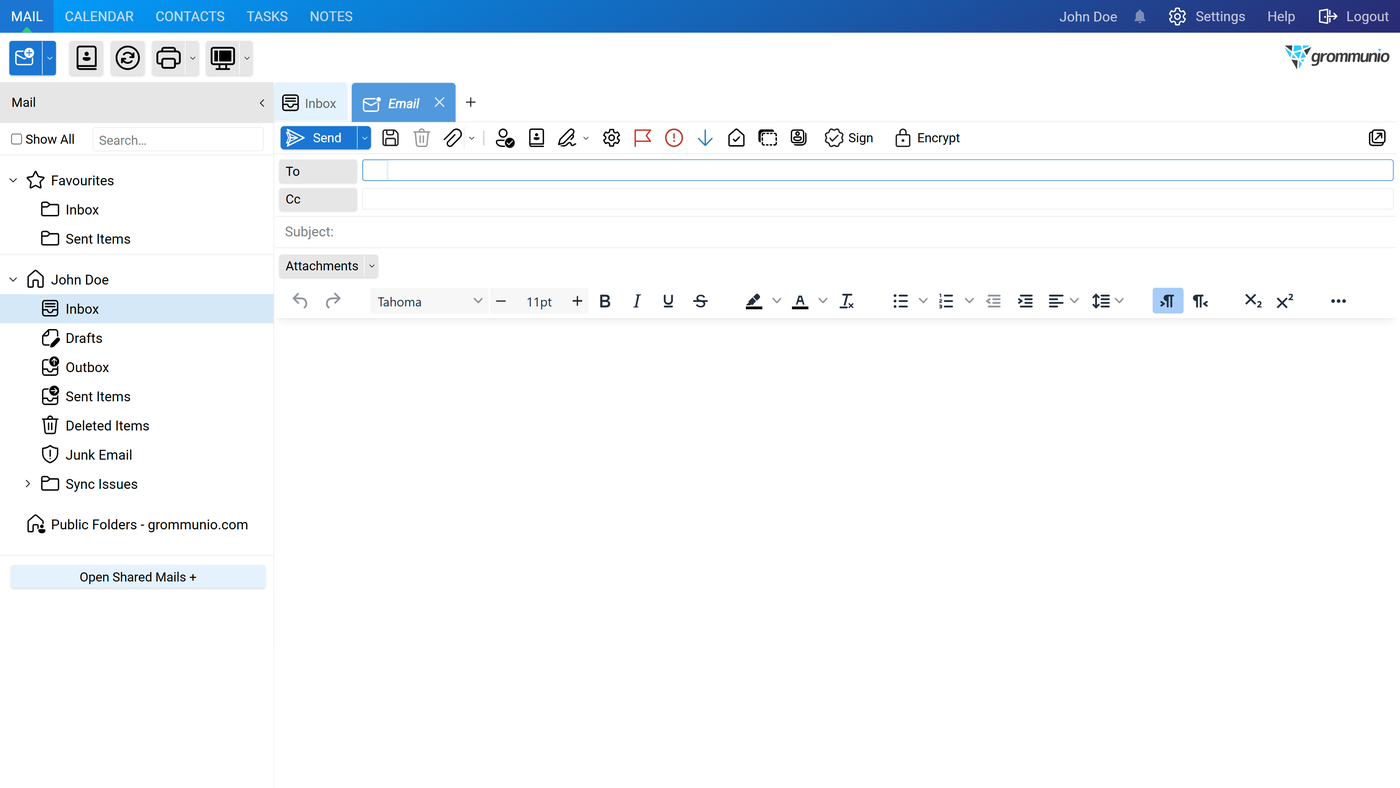
Message Composition Toolbar
Section titled “Message Composition Toolbar”The Message Composition Toolbar appears when creating a new email and provides quick access to commonly used actions and message-specific options.
Send Button
Section titled “Send Button”The Send button delivers the message immediately on the journey to the selected recipients. The sent mail is automatically moved to the Sent Items folder for future reference. It also provides an additional option:
- Send Later Allows scheduling the email for delivery at a later date and time. A confirmation pop-up is available to review or modify the selected send time before finalizing the scheduled delivery.
Saves the current message to the Drafts folder.
Delete
Section titled “Delete”Becomes available after the message has been saved at least once. Moves the current draft to the Deleted Items folder.
Attachment Dropdown
Section titled “Attachment Dropdown”Provides two methods for adding attachments:
- File Upload - Upload a file directly from the computer.
- Attach Item - Attach an item from the mailbox (email, contact, calendar entry, task, or note) as an attachment or as text only.
Check Names
Section titled “Check Names”Resolves typed email addresses. The system automatically completes an address when there is a single match within the domain or shows suggestions if multiple matches exist.
Address Book
Section titled “Address Book”Opens the address book for selecting recipients from:
- the Global Address List (GAL),
- personal or shared gromox Contact folders.
Signatures
Section titled “Signatures”Allows inserting a predefined signature. New signatures may be created using Add Signature.
Message Options
Section titled “Message Options”The Message Options area provides additional tools to control message handling, visibility, and security.
Message Importance
Section titled “Message Importance”Sets the priority of the message (e.g., High, Normal, Low).
Message Sensitivity
Section titled “Message Sensitivity”The Sensitivity setting allows marking a message with a confidentiality level. This information is included in the message header and can be interpreted by the recipient's mail client.
Sensitivity Options:
- Normal No special sensitivity is applied. This is the default setting.
- Personal Indicates that the message contains personal information. The recipient is advised to treat the message accordingly.
- Private Marks the message as private. Some email clients may restrict actions such as forwarding or printing.
- Confidential Indicates that the message contains confidential or sensitive information. This setting signals a higher level of discretion.
To protect message content from unauthorized access, use Encrypt Message instead.
Tracking Options
Section titled “Tracking Options”Includes options such as: Request a read receipt for this message.
Set Flag
Section titled “Set Flag”Marks the message with a follow-up flag for later attention. Flags help organize messages by priority and due date.
Options: Today, Tomorrow, This week, Next week, No date, Custom
Additional Actions
Section titled “Additional Actions”- Set reminder - Adds a reminder notification for the flagged message.
- Complete - Marks the flagged message as completed.
- None - Removes any existing flag from the message.
Priority: High / Low
Section titled “Priority: High / Low”- High Priority - Marks the email as important to draw attention.
- Low Priority - Marks the message as low priority.
Request Read Receipt
Section titled “Request Read Receipt”Sends a read receipt request to the recipient, allowing notification when the message is opened.
Show BCC Field
Section titled “Show BCC Field”Displays the Blind Carbon Copy (BCC) field, allowing additional recipients to be added without revealing them to others.
Show From Field
Section titled “Show From Field”Displays the From field. Useful when sending messages on behalf of another mailbox (permissions required).
Sign Message
Section titled “Sign Message”Digitally signs the message to ensure its authenticity and confirm that it was not modified during transmission.
Encrypt Message
Section titled “Encrypt Message”Encrypts the message so that only the intended recipient can read it, ensuring privacy during transmission.
Pop-Up Message Window
Section titled “Pop-Up Message Window”Any message can be opened in its own separate pop-up window. This allows the user to compose, read, or edit the message independently of the main browser tab.
Using the pop-up window is particularly useful when working with multiple messages simultaneously.
Message Fields
Section titled “Message Fields”In addition to the Message Composition Toolbar, the message editor provides various input fields for defining recipients and message content.
Recipients
Section titled “Recipients”- To Specifies the primary recipient(s) of the message.
- Cc Specifies recipient(s) who should receive a copy of the message.
- Bcc The Bcc field is not displayed by default. It becomes visible when the "Show BCC: field" button is pressed or when Bcc Recipient is entered via the To or Cc button (which open the address book for recipient selection). Bcc recipient(s) receive(s) the message without being visible to other recipients.
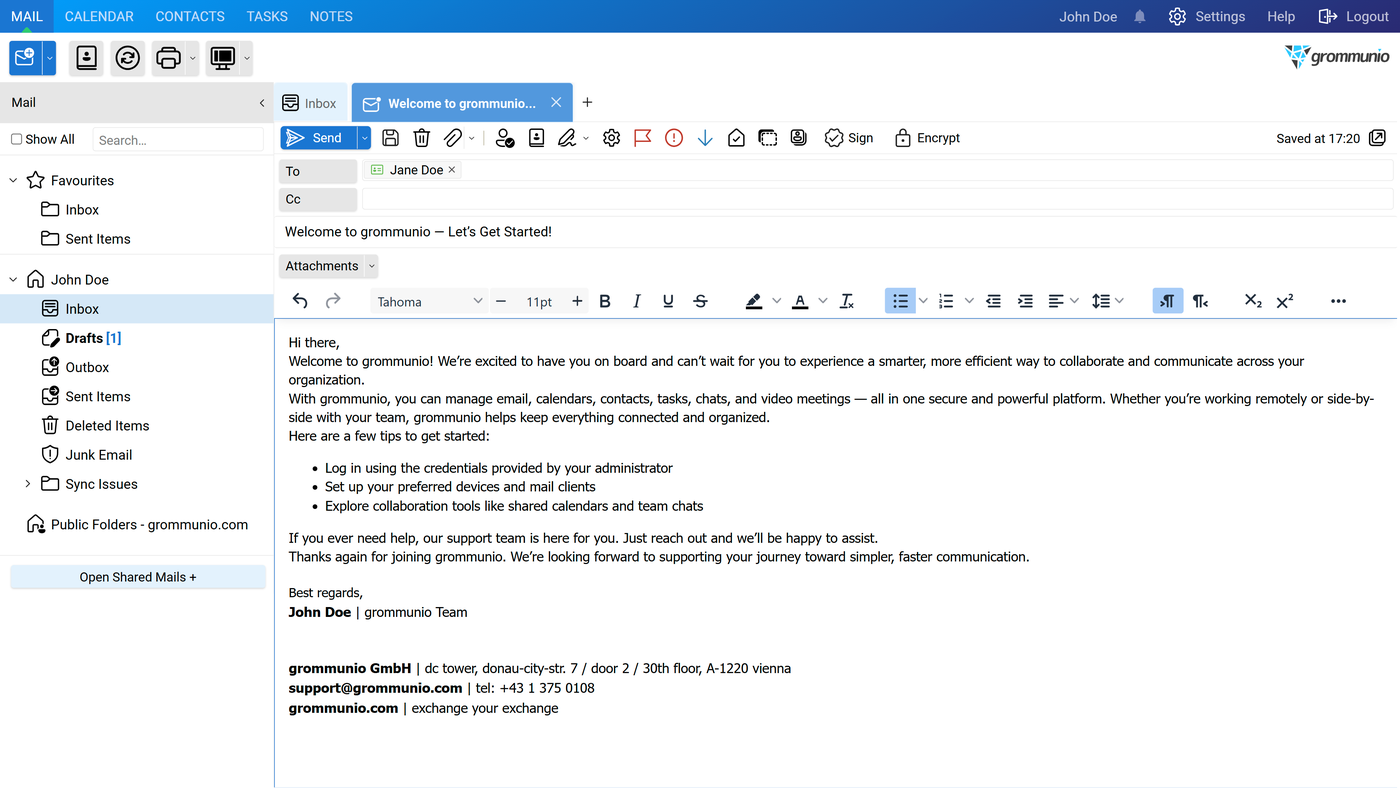
Subject
Section titled “Subject”The Subject field defines the topic or short summary of the message. It is recommended to provide a clear and descriptive subject to help recipients understand the purpose of the email.
Message Body
Section titled “Message Body”The Message Body field contains the main content of the email.
When using HTML as the composition format (default), the message body provides a wide range of formatting options, including:
- font selection,
- font size adjustments,
- text styles (bold, italic, underline),
- paragraph and list formatting,
- additional typographical and layout options.
Message View Options
Section titled “Message View Options”Double-clicking an email opens it in a full view, allowing the complete message content and associated details to be displayed for review.
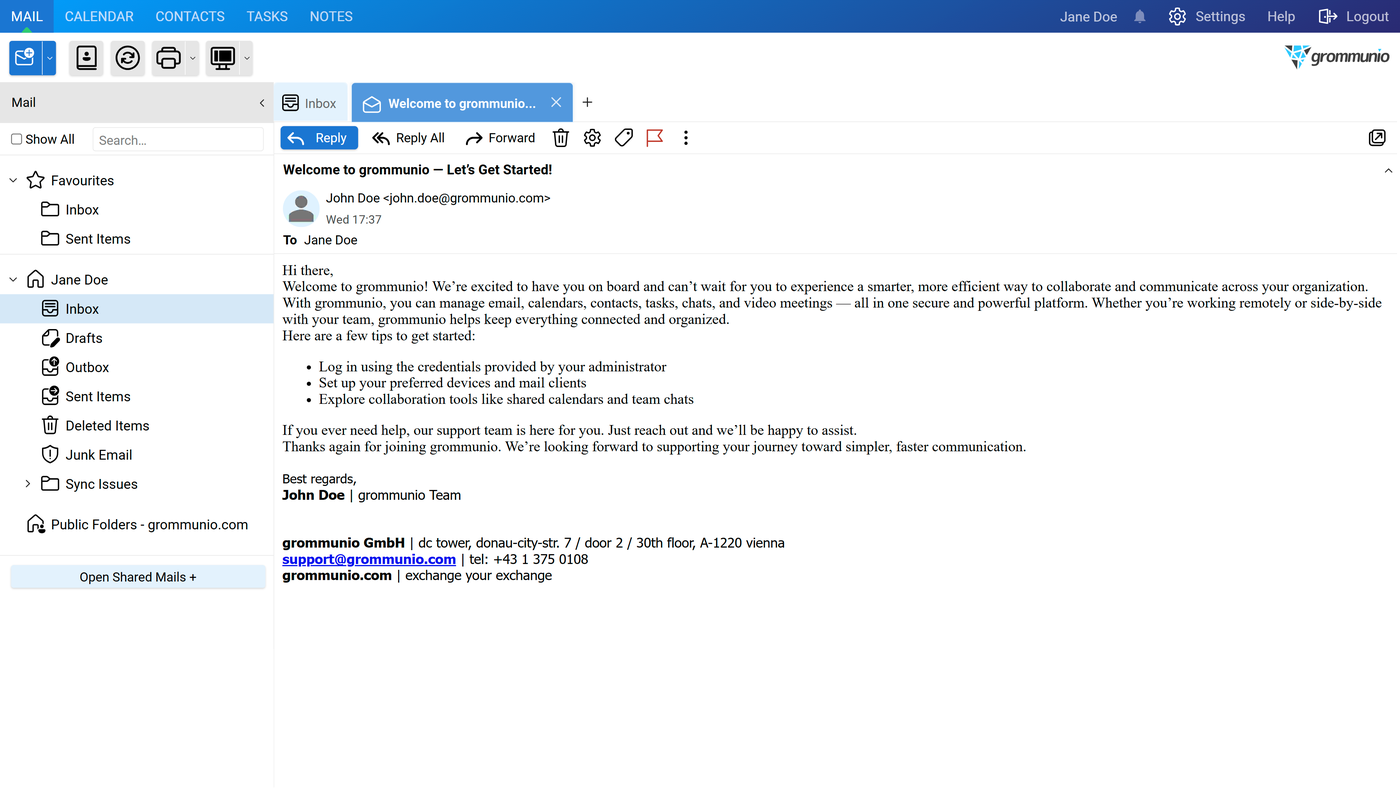
At the top of the message view, a set of action buttons is displayed. These options allow quick interaction with the currently selected message.
Reply Options
Section titled “Reply Options”- Reply Sends a response to the original sender of the message.
- Reply All Sends a response to the original sender and all recipients listed in the To and Cc fields.
- Forward Forwards the selected message to one or more new recipients.
Message Actions
Section titled “Message Actions”- Delete Moves the message to the Deleted Items folder.
- Message Options Opens message-related options, such as importance, sensitivity, and detailed technical information.
The Properties section displays technical metadata related to the message such as Internet Headers and Object ID. This information is primarily intended for troubleshooting, auditing, or advanced analysis.
-
The Internet Headers view shows the full set of email headers associated with the message. These headers contain detailed transport and routing information, including:
- Sender and recipient metadata
- Mail servers involved in message delivery
- Timestamps and protocol-related data
- Authentication and security details
Internet headers are typically used by administrators or support personnel to diagnose delivery issues or analyze message flow.
-
The Object ID is a unique internal identifier assigned to the message within the mailbox system. It is used internally for message tracking and reference purposes and may be requested by support when investigating specific messages.
-
Categories (Tags) The Categories option allows assigning one or more categories to a message. Categories help organize, classify, and visually distinguish messages.
Each category is represented by a color and name.
The Categories menu allows users to manage available categories, including:
- assigning or removing categories from a message,
- renaming existing categories,
- changing category colors,
- creating new custom categories.
-
Flag Marks the message with a follow-up flag for later action or tracking.
Additional Options Menu
Section titled “Additional Options Menu”Clicking the More Options menu opens additional actions:
- Mark Unread - Marks the message as unread, returning it to the unread state.
- Copy / Move - Copies or moves the message to another folder within the mailbox.
- Print - Opens the print dialog to print the message content.
- Edit as New - Opens the message content in a new composition window, allowing it to be modified and sent as a new email.
- Download - Downloads the message as a file to the local computer.
Message Information Banner
Section titled “Message Information Banner”If applicable, informational banners may be displayed above the message content. These banners indicate properties such as:
- message sensitivity (e.g., Private),
- message importance (e.g., High importance).
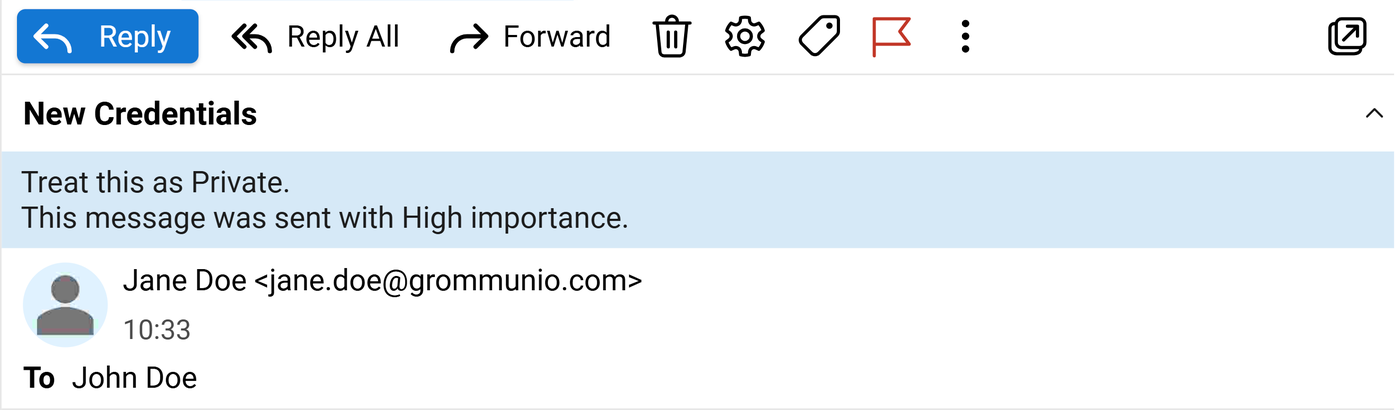
These indicators provide additional context but do not enforce security restrictions by themselves.
Extended Message Options
Section titled “Extended Message Options”Right-clicking a message directly in the inbox, without opening it, provides access to additional options that enable faster message management and organization. These extended features include:
- Move to Junk Folder - Quickly move unwanted or spam emails to the junk folder.
- Send to - Creates a new email with the selected message attached as a file, allowing the message to be forwarded as an attachment with ease.
- Export as - Saves or exports the email in .eml format (email file) or .zip format for archiving or sharing.
- Rules - Sets up automated rules to manage incoming emails. Rule options include:
- Always move messages from [email] - Automatically move messages from a specific sender to a designated folder.
- Always move messages that are sent to [recipients] - Automatically move messages sent to a specific group of recipients.
- Always move messages with this [subject] - Automatically move emails that contain specific keywords in the subject or body.
- Create Rule - Allows the creation of custom rules based on specific conditions and actions to improve email organization.
- Create Appointment - Converts the email into a calendar event or appointment.
- Create Task - Turns the email into a task for follow-up or action in your task management system.
In addition to the options available when right-clicking on an email, there are a couple of additional features in grommunio Web that allow for quicker management of messages.
Changing Email Importance
Section titled “Changing Email Importance”Right-clicking the Importance column of an email (the column displaying the red exclamation mark or other symbols) allows the importance level of the message to be changed quickly. The following options are available:
- Low - Mark the email as low priority.
- Normal - Set the email's importance to normal.
- High - Mark the email as high priority.
This feature enables the adjustment of an email's urgency without requiring the message to be opened.
Marking an Email as Unread
Section titled “Marking an Email as Unread”To quickly mark an email as unread, select the symbol on the far left of the email row.
Performing this action immediately updates the status of the email to unread, thereby assisting in the organization and monitoring of messages that may require follow-up or further attention at a later time.
The use of such quick actions supports efficient management of the inbox, enabling users to prioritize communications effectively and maintain better control over the flow of incoming messages.
Quickly Setting Flag
Section titled “Quickly Setting Flag”A flag can be quickly set on a message by clicking in the Flag column within the Mail view. When the pointer hovers over a message, the flag icon becomes visible. Clicking this icon opens the follow-up menu, from which the desired flag option may be selected.