Settings
General
Section titled “General”The following options are available:
1. Account Information
Section titled “1. Account Information”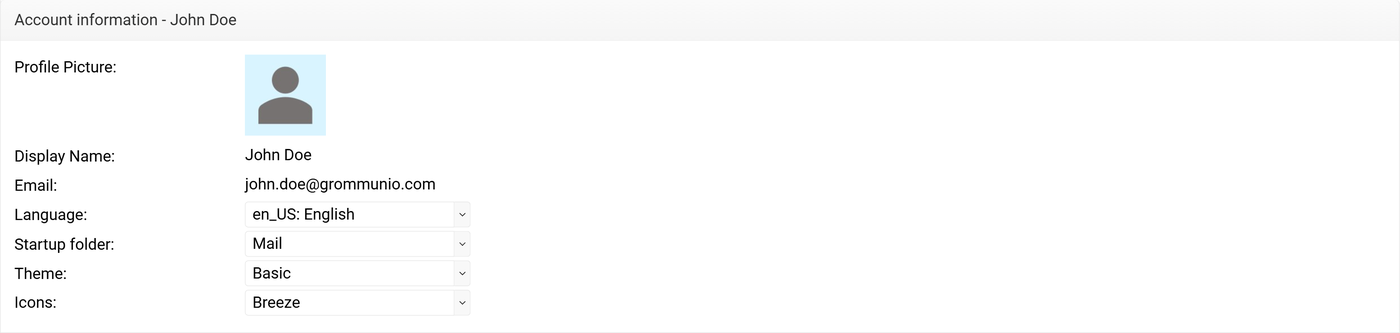
Profile Picture Allows you to upload or change your profile image. Accepted formats include common image types (JPEG, GIF, PNG, BMP).
Display Name The name that will appear to other users.
Email Displays the primary email address of the user.

This field is not editable within grommunio Web.
Language Sets the interface language for grommunio Web.
Example: en_US – English
Other server-provided languages may be available.
Startup Folder Specifies which module loads first after login.
Options include:
- Calendar
- Contacts
- Tasks
- Notes
Theme Determines the visual theme of the interface.
Example: Basic
Icons Selects the icon pack used by the user interface.
Options: Breeze, Classic
2. Inbox Navigation
Section titled “2. Inbox Navigation”Inbox navigation determines how items are displayed and loaded within the inbox.
The navigation method can be selected from the following options:
- Infinite Scroll (selected): Additional items load automatically as the user scrolls downward.
- Pagination: Items are displayed on separate pages, with navigation controls used to move between pages.
The number of items loaded at a time or displayed per page can also be configured. Options: 50, 100, 150, 250, 1000
3. Display
Section titled “3. Display”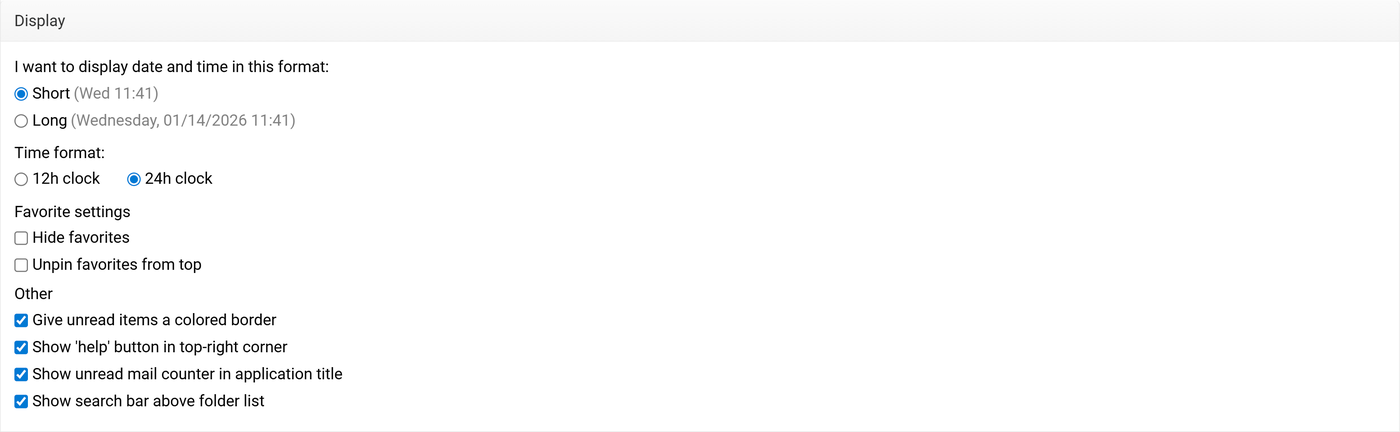
These settings control how information looks and behaves in the application. Choose how dates and times are shown in the interface.
Control how the time itself is displayed.
4. File previewing
Section titled “4. File previewing”
Controls how attached documents are displayed when opened in the web interface.
When enabled, supported attachments (such as PDFs and OpenDocument files) are opened directly in the browser instead of being downloaded first.
- Document/PDF default zoom
Defines the zoom level for Document/PDF during preview.
Options:
Auto,Actual size,Page width
5. Address Book
Section titled “5. Address Book”
Controls which address list is used by default when the address book is opened.
6. Mailbox Usage
Section titled “6. Mailbox Usage”
Displays information about mailbox storage consumption.
7. Reset Settings
Section titled “7. Reset Settings”
Allows restoration of all personal settings to their original defaults such as Favourites, Layout, Plugins, Language, etc.
8. Version Information
Section titled “8. Version Information”
Provides technical version details for troubleshooting or administration.
1. General mail settings
Section titled “1. General mail settings”
Controls how emails are displayed and opened in the web interface.
Location of preview pane determines whether and where the message preview pane is shown. Options: No preview, Right, Bottom
When Close original message on reply or forward is enabled, the original email closes automatically after replying or forwarding.
2. Compose mail settings
Section titled “2. Compose mail settings”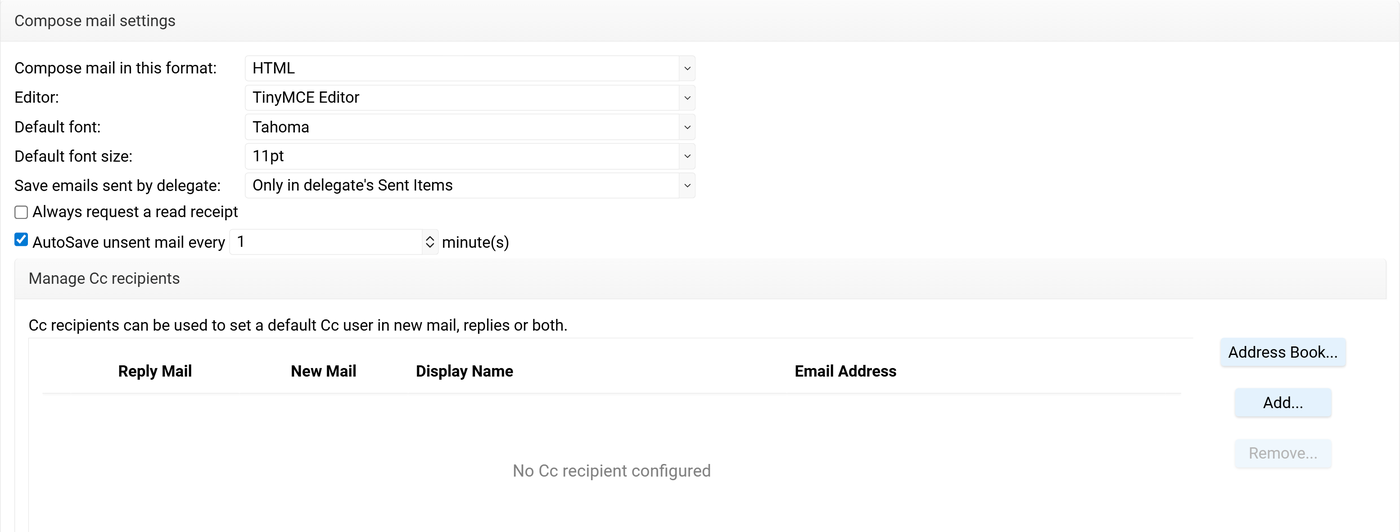
Defines defaults used when creating new emails.
-
Compose mail in this format - Sets the default message format. HTML allows formatted text, fonts, and colors. Options:
HTML,Plain Text -
Editor – Selects the editor used for composing emails. TinyMCE Editor provides a rich text (WYSIWYG) editing experience.
-
Default font – Specifies the font used when composing messages.
-
Default font size – Sets the initial font size for new emails (for example,
11pt). -
Save emails sent by delegate – Controls where sent emails are stored when sending on behalf of another user. Options:
- In both representee's and delegate's Sent Items
- Only in delegate's Sent Items
- Only in representee's Sent Items
-
Always request a read receipt – When enabled, every outgoing message requests a read receipt from the recipient.
-
AutoSave unsent mail every – Automatically saves draft messages at the specified interval (for example, every
1minute) to prevent data loss. -
Manage Cc recipients – Allows configuring default Cc recipients for:
- New Mail
- Reply Mail
- Or both
To add a recipient either click on Address Book or the Add… Button.
By default the recipient will be used for Reply Mail and New Mail reflected by the green check mark icon. This can be changed by clicking the green ICON.
3. Incoming mail
Section titled “3. Incoming mail”Controls how incoming messages are handled and displayed.
- How to respond to requests for read receipts – Defines the default behavior when a sender requests a read receipt.
- Always send a response
- Never send a response
- Ask me before sending a response
- Automatically mark mail as read after – Marks a message as read after it has been open for the specified number of seconds.
0means immediately. - View mail in this format – Defines how incoming messages are displayed. Options:
HTML,Plain Text
4. Signatures
Section titled “4. Signatures”
grommunio Web allows users to manage multiple email signatures, with the flexibility to set different signatures for new messages, as well as for replies and forwarded emails.
To set up a signature to create or modify an email signature in grommunio Web, follow these steps:
- Scroll to Signatures and click New to create a new signature.
- Enter a custom signature name for easy identification.
- Compose a signature using plain text, formatted text, or HTML.
- Once finished click the Save Signature Button.
- If a signature is not needed anymore, select the signature and click on Delete.
Signature templating
Section titled “Signature templating”grommunio Web supports dynamic signature attributes, which automatically insert information from the user profile into the signature. These attributes correspond to account details configured on the server, such as name, phone number, company, and job title.
Important: The availability of attributes depends on the organization's server configuration. For additional attributes or modifications to the available ones, please contact the system administrator.
How It Works: Attributes are enclosed in curly brackets with a percentage sign, e.g., {%attribute}. When composing an email, grommunio Web will replace these placeholders with the actual user information. If an attribute is not configured in the profile, it will not appear in the signature.
Signature Placeholders
Section titled “Signature Placeholders”The following general attributes can be used in email signatures:
{%firstname}– First name{%initials}– Initials{%lastname}– Last name{%displayname}– Full display name{%title}– Job title{%company}– Company name{%department}– Department{%office}– Office location{%assistant}– Name of the assistant{%phone}– Primary phone number{%primary_email}– Primary email address{%address}– Street address{%city}– City{%state}– State/Region{%zipcode}– ZIP/Postal code{%country}– Country{%phone_business}– Primary business phone number{%phone_business2}– Secondary business phone number{%phone_fax}– Fax number{%phone_assistant}– Assistant's phone number{%phone_home}– Primary home phone number{%phone_home2}– Secondary home phone number{%phone_mobile}– Mobile phone number{%phone_pager}– Pager number
S/MIME
Section titled “S/MIME”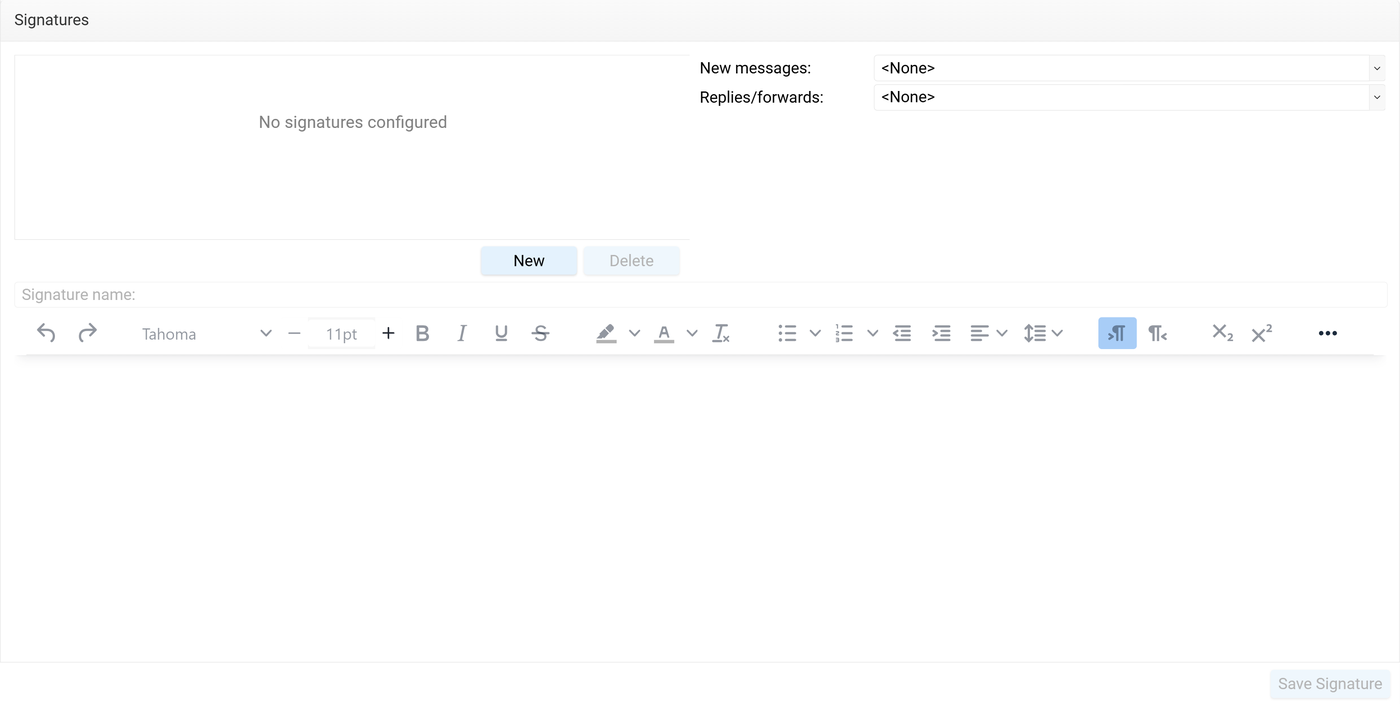
1. Personal certificate
Section titled “1. Personal certificate”- Certificate status – Indicates whether a valid personal certificate is associated with the account. If none is present, secure email features (such as S/MIME signing or encryption) cannot be used.
- Change passphrase for last certificate – Allows changing the passphrase of the most recently uploaded private certificate. This option is only available when a valid certificate exists.
2. Upload your certificate
Section titled “2. Upload your certificate”- Private certificate (PKCS#12 format) – Upload your personal certificate file (usually with
.p12or.pfxextension). grommunio Web accepts only valid certificates and stores only one private certificate per user. - Certificate passphrase – The password that protects the private certificate file. This is required to import the certificate successfully.
- Upload – Imports the selected certificate into grommunio Web after validating it.
3. Public & Private certificates
Section titled “3. Public & Private certificates”- Certificate list – Displays all public and private certificates stored on the server for the account.
- Email – Email address associated with the certificate.
- Valid from – Start date of the certificate's validity period.
- Expires – Expiration date of the certificate.
- Type – Indicates whether the certificate is public or private.
- Filter on Email – Filters the certificate list by email address.
- Remove – Deletes the selected certificate from the server.
- Details – Displays detailed information about the selected certificate.
Out of Office
Section titled “Out of Office”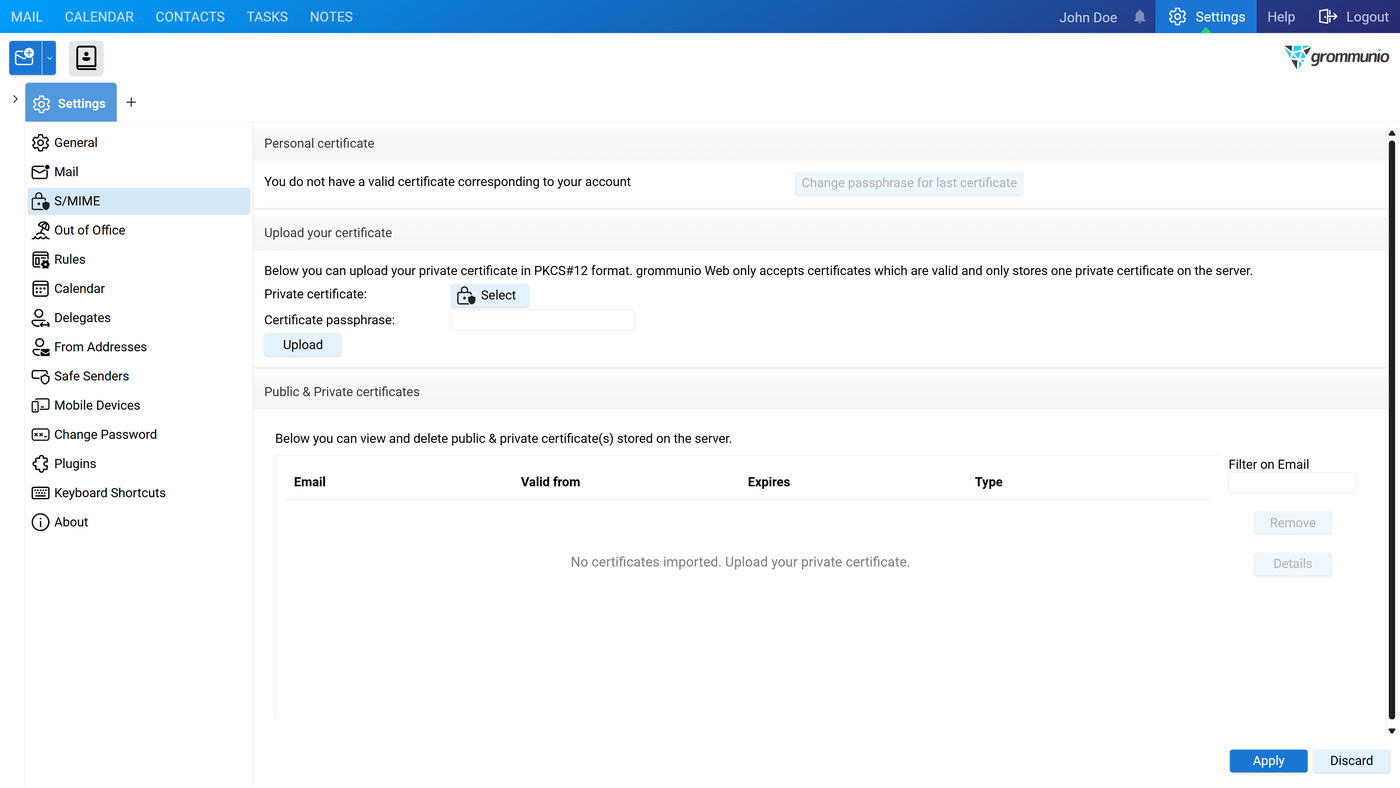
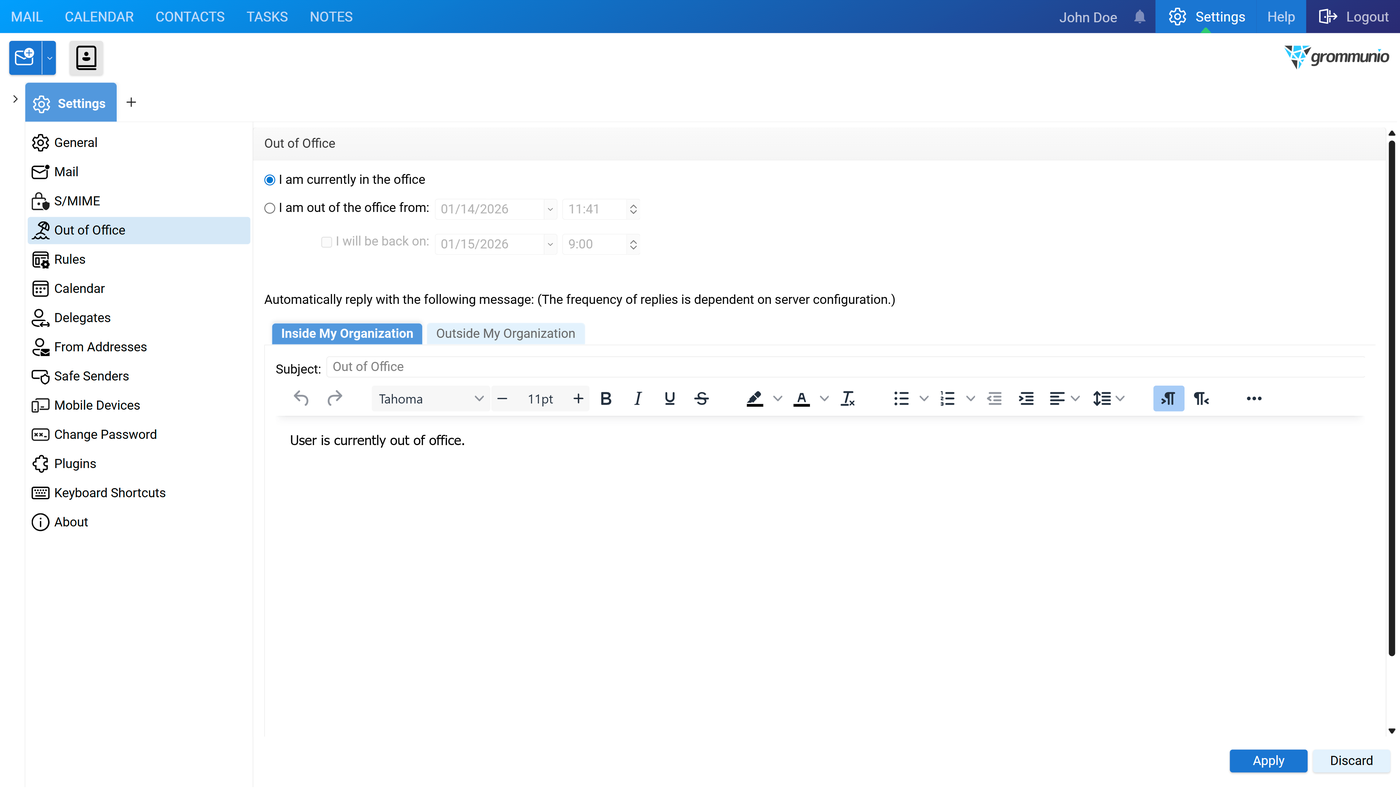
Out of Office settings
Section titled “Out of Office settings”- I am currently in the office – Disables Out of Office automatic replies.
- I am out of the office from – Enables Out of Office replies starting at the specified date and time.
- I will be back on – Optionally defines the return date and time, after which Out of Office replies are automatically disabled.
Automatic reply message
Section titled “Automatic reply message”Automatically reply with the following message – Enables automatic replies using the message content defined below. The frequency of replies depends on server configuration.
- Inside My Organization – Message sent to senders within your organization (internal recipients).
- Outside My Organization – Message sent to external senders outside your organization.
- Auto-reply to people outside my organization – Enables automatic replies for messages received from senders outside your organization.
- My contacts only – Sends automatic replies only to external senders who are stored in your personal contacts.
- Anyone outside my organization – Sends automatic replies to all external senders, regardless of whether they are in your contacts.
- Subject – Sets the subject line of the automatic reply (for example, Out of Office).
- Message body – The content of the automatic reply message. Supports formatted text (HTML), fonts, and basic styling.
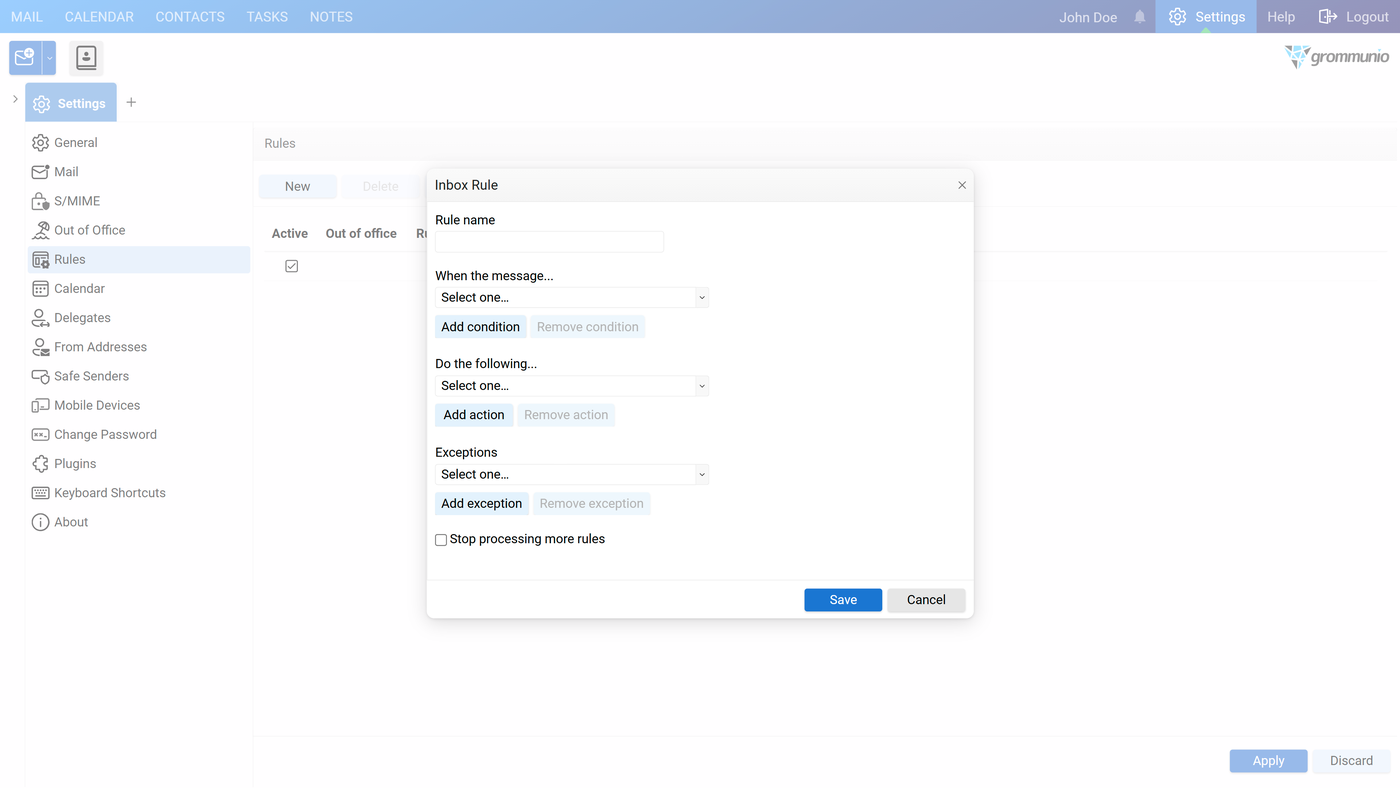
- Update rules for – Selects the mailbox for which mail rules are managed. myself applies rules to own mailbox.
- New – Creates a new mail rule.
- Delete – Removes the selected mail rule. This option is only available when a rule is selected.
- Edit – Opens the selected mail rule for modification. This option is only available when a rule is selected.
- Active – Indicates whether a rule is currently enabled. The checkbox can be used to deactivate or reactivate the rule without deleting it.
- Out of office – Indicates whether the rule is related to Out of Office functionality.
- Rule – Displays the name or description of the mail rule.
- Rule order controls – Allows changing the order in which rules are evaluated. Rules are processed from top to bottom.
A mail rule is made of four main parts:
- Rule name – Just a label so you recognize it later
- Conditions – When the rule should trigger
- Actions – What should happen to the message
- Exceptions (optional) – When the rule should not apply
"When the message…" (Conditions)
Section titled “"When the message…" (Conditions)”A Condition defines which emails the rule applies to. A rule may contain one or more conditions.
Possible conditions:
- is received from …
- includes these words in the sender's address …
- includes these words in the recipient's address …
- includes these words in the subject …
- includes these words in the body …
- includes these words in the transport headers …
- has importance …
- has an attachment
- is sent to …
- is sent only to me
- has my name in the Cc field
- does not have my name in the To or Cc field …
- has my name in the To or Cc field
- has sensitivity …
- is received after …
- is received before …
- size is at least …
- size is at most …
- has my name in the To field
- is received (all messages)
"Do the following…" (Actions)
Section titled “"Do the following…" (Actions)”Action defines what happens when condition(s) match. A rule may contain one or more actions.
Available actions include:
- Move the message to folder…
- Copy the message to folder…
- Delete the message
- Redirect the message to…
- Forward the message to…
- Forward the message as attachment to…
- Mark the message as read…
Exceptions
Section titled “Exceptions”Exceptions prevent the rule from running in specific cases. A rule may contain one or more exceptions.
Possible exceptions:
- is received from …
- includes these words in the sender's address …
- includes these words in the recipient's address …
- includes these words in the subject …
- includes these words in the body …
- includes these words in the transport headers …
- has importance …
- has an attachment
- is sent to …
- is sent only to me
- has my name in the Cc field
- does not have my name in the To or Cc field …
- has my name in the To or Cc field
- has sensitivity …
- is received after …
- is received before …
- size is at least …
- size is at most …
- has my name in the To field
"Stop processing more rules"
Section titled “"Stop processing more rules"”If checked:
Once this rule matches, no further rules are applied
Useful when this rule is a "final" action (e.g., delete or move)
Example
Section titled “Example”Condition: Sender includes newsletter
Action: Mark as read, Move to "Newsletters"
Calendar
Section titled “Calendar”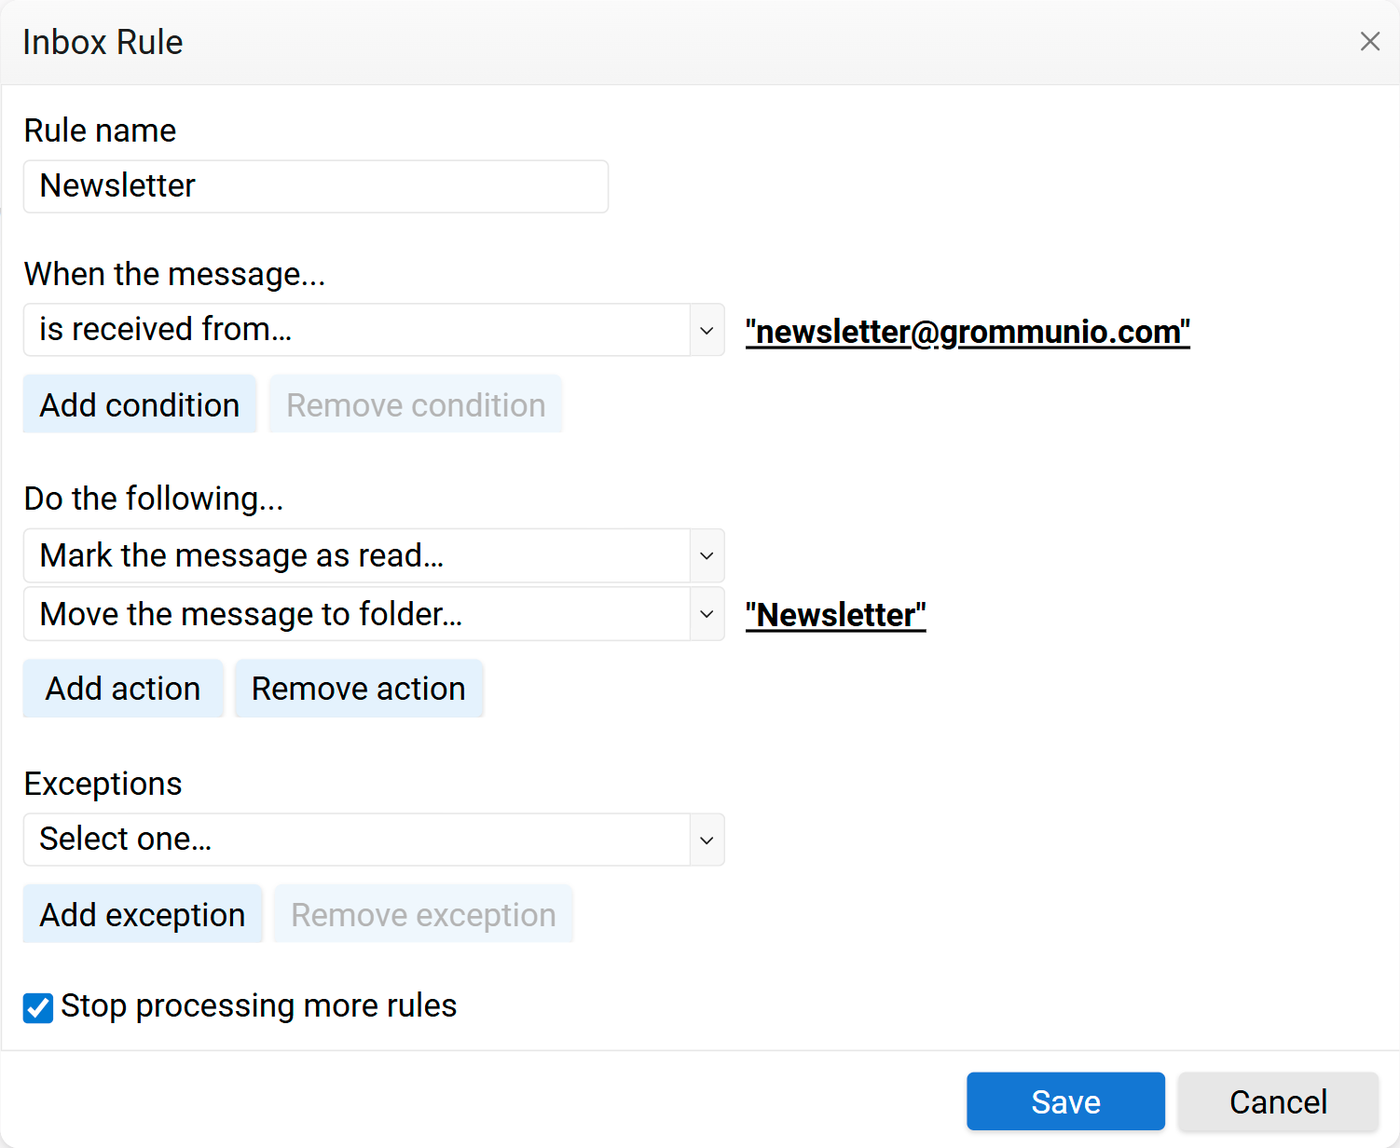
1. General calendar settings
Section titled “1. General calendar settings”First Day of the Week Sets the starting weekday for calendar views.
Common values: Monday or Sunday
Start of Workday Defines the daily work start time for calendar scheduling.
Example: 09:00
End of Workday Defines the end of the workday.
Example: 17:00
Calendar Resolution Determines the time grid size for calendar slots.
Options: 5 minutes, 6 minutes, 10 minutes, 15 minutes, 30 minutes, 1 hour
Default Appointment Duration Sets the default duration for new appointments.
Example: 30 minutes
Default Status for All-Day Appointments Controls the default availability status.
Possible values:
- Free
- Tentative
- Busy
- Out of Office
Working Days Defines the days considered part of the regular work week.
Example: Monday–Friday (Mo–Fr)
2. Calendar view settings
Section titled “2. Calendar view settings”When multiple calendars are selected for display (e.g., own calendar plus shared team or resource calendars), two viewing modes are available: Side-by-side and Overlay.
- Side-by-side mode – Each calendar is displayed in its own separate column. Time runs vertically, while calendars are arranged horizontally next to each other.
- Overlay mode – All selected calendars are merged into a single view. Appointments from different calendars appear in the same time grid.
Events are usually distinguished by different colors, labels or calendar names.
3. Reminder Settings
Section titled “3. Reminder Settings”Controls whether reminders are automatically applied to newly created appointments and meetings, including both standard (time-based) appointments and all-day events, using the configured default reminder times.
Delegates
Section titled “Delegates”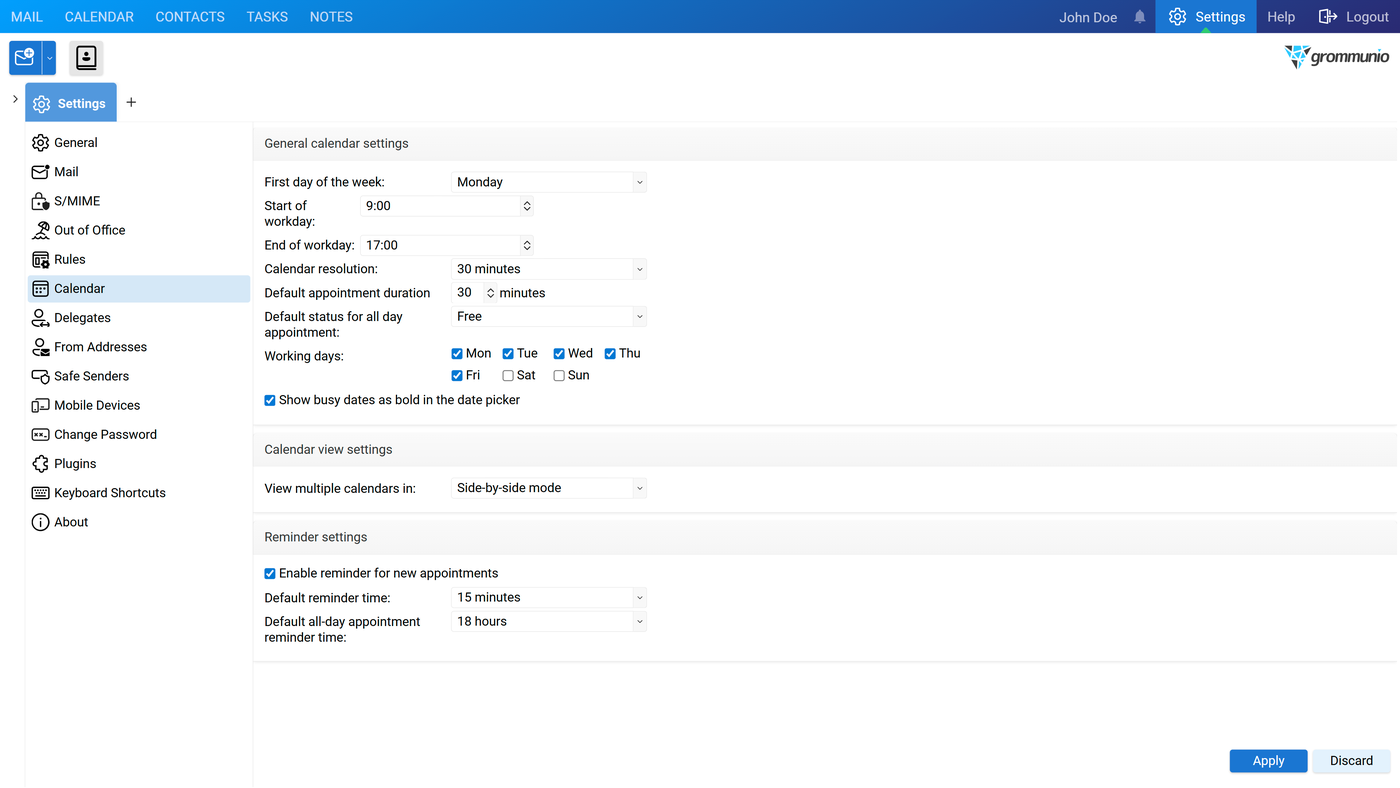
Delegate settings allow designated users (delegates) to act on behalf of the mailbox owner. Delegates can be granted permission to send items, such as emails or meeting requests, using the mailbox owner's identity, depending on the permissions assigned.
This section is used to manage delegates rather than simple folder sharing:
Assigns a new delegate to the mailbox. The delegate can be given specific permissions, such as sending on behalf of the mailbox owner.
- Add Assigns a new delegate to the mailbox. The delegate can be given specific permissions, such as sending on behalf of the mailbox owner.
- Remove Revokes delegate access from a previously assigned user.
- Permission Configures or modifies the permissions granted to a selected delegate.
After selecting Add, the Address Book opens, allowing a user to be chosen as a delegate. Once a delegate is selected, a permissions dialog is displayed where access levels and additional options can be configured.
Delegate Permissions
Section titled “Delegate Permissions”The selected delegate can be granted specific permissions for individual mailbox components such as:
Calendar, Tasks, Inbox, Contacts, Notes, Journal
Each mailbox component can be assigned one of the following access levels:
- Owner Grants full control over the component, including reading, creating, modifying, and deleting items.
- Secretary Allows management of items on behalf of the mailbox owner, such as creating, editing, and responding to items, without full ownership privileges.
- Only read Provides read-only access. Items can be viewed but not created, modified, or deleted.
- None Denies all access to the component. (Default)
Additional Options
Section titled “Additional Options”Delegate receives copies of meeting-related messages sent to me - When enabled, the delegate receives copies of meeting invitations, updates, and cancellations that are sent to the mailbox owner.
Delegate can see my private items - When enabled, the delegate is allowed to view items marked as private across the permitted folders. If disabled, private items remain hidden from the delegate, even if other permissions are granted.
From Addresses
Section titled “From Addresses”In this setting, it is possible to define which sender address is automatically selected in the "From" field when composing a new message, replying, or forwarding an email.
Multiple sender addresses can be added to the list; however, only one address can be selected as the default for each action type (New Mail, Reply Mail, or Forward Mail).
The default sender is indicated by a green icon. Selecting a different sender for the same action changes the previously selected address back to red, ensuring that only one default sender is active per action.
This mechanism allows precise control over the sender identity used in different email scenarios while preventing conflicting defaults.
- Reply Mail Indicates whether the address can be used as the sender when replying to an existing email. Only one address can be selected as the default sender. A green icon indicates permission is granted. A red X indicates permission is denied.
- New Mail Indicates whether the address is used as the sender when composing a new email. Only one address can be selected as the default sender. A green icon indicates the active default sender; a red icon indicates all others.
- Forward Mail Indicates whether the address is used as the sender when forwarding an email. Only one address can be selected as the default sender. A green icon marks the selected default sender; a red icon marks inactive entries.
- Name Displays the descriptive name associated with the sender identity.
- Email Address Displays the email address that will appear in the "From" field.
Available Actions
Section titled “Available Actions”- Address Book… Opens the Address Book to select a contact or address for use as a sender identity.
- Add… Creates a new sender entry manually. This option is used to add custom sender addresses that are not selected from the Address Book.
- Edit… Allows editing of sender entries that were previously created manually using the Add button. Sender identities imported from the Address Book cannot be edited here.
- View… Displays the contact details of the selected sender identity in read-only mode. This applies only to entries that were previously selected from the Address Book.
- Remove… Deletes the selected sender identity from the list. Removes access to that sender address in the "From" field.
Safe Senders
Section titled “Safe Senders”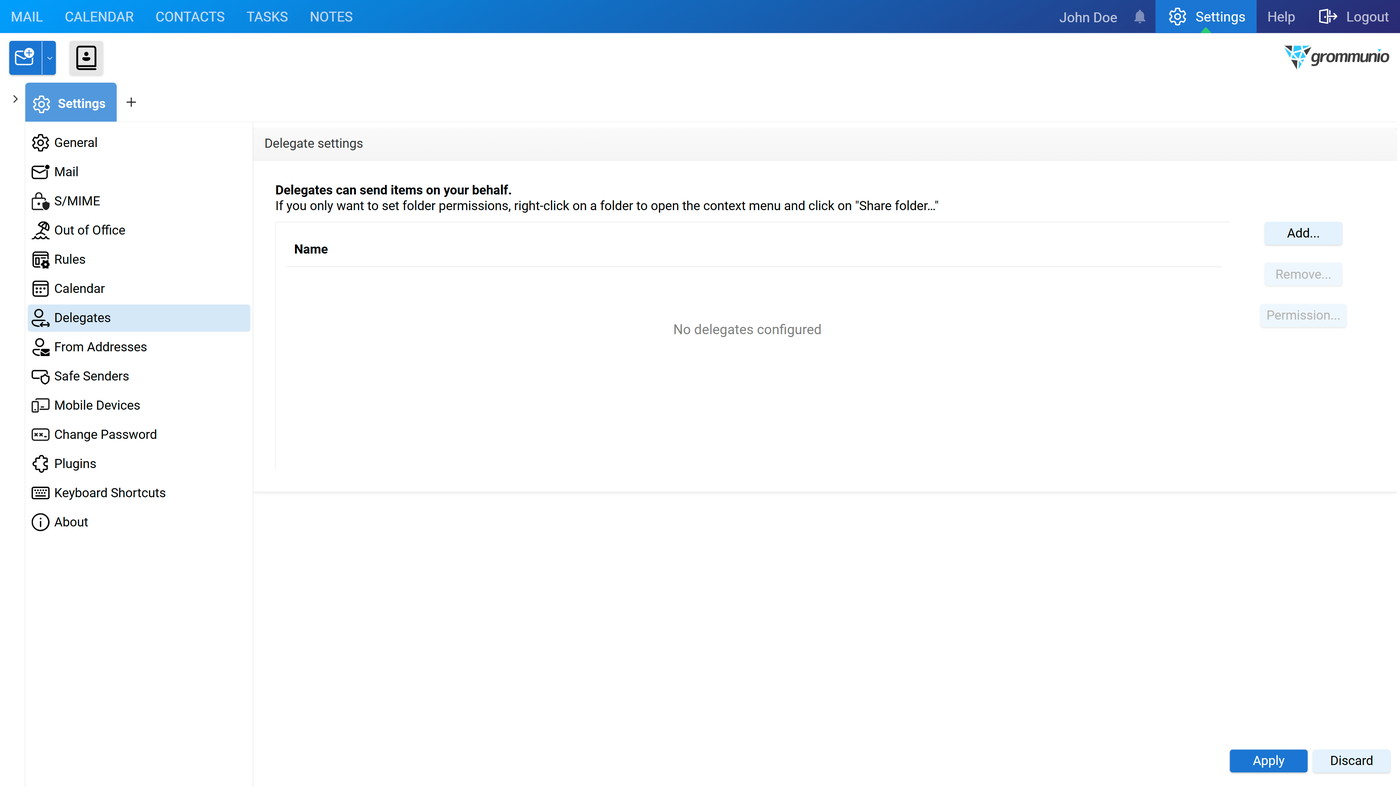
The Safe Senders feature in grommunio Web allows users to designate specific email addresses or domains as trusted.
For these trusted senders, you no longer need to click "Download Embedded Images" in emails. Images and other content from these senders are loaded automatically, making reading emails faster and safer.
Mobile Devices
Section titled “Mobile Devices”
Overview
Section titled “Overview”Mobile Device Management (MDM) is a plugin for grommunio Web. It allows users to view the list and details of mobile devices configured to sync the account data. MDM also enables users to issue resync, removal or remote wipe of a specific device.
The MDM plugin is server-side enabled and always visible in the plugin list.
The initial view displays a list of all mobile devices currently configured to synchronize account data, along with additional device information:
Device,User Agent,Provisioning Status,Last Connect,Device ID
Expanding the column selection reveals the following additional information:
Device OS,Device Info,First Sync time
The set of visible columns and their order are fully configurable.
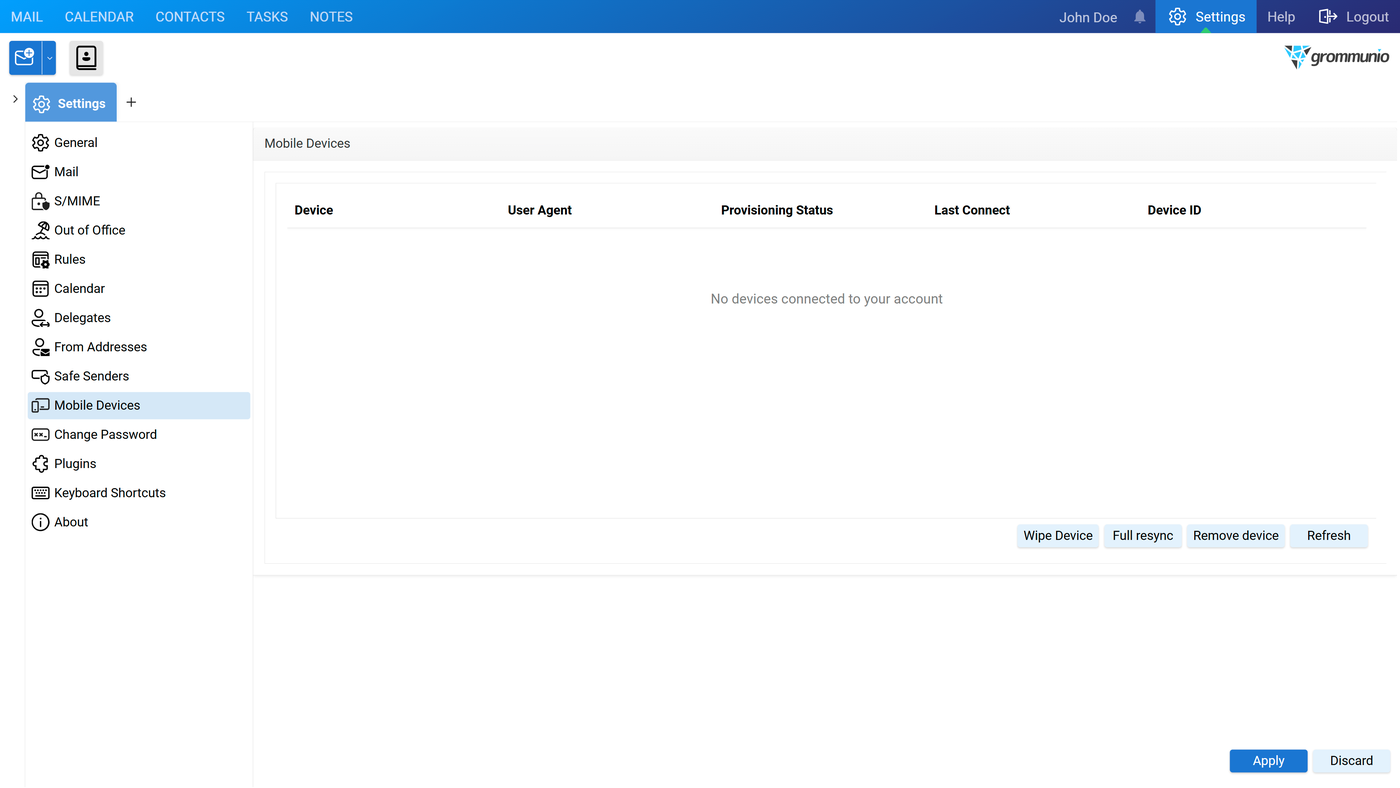
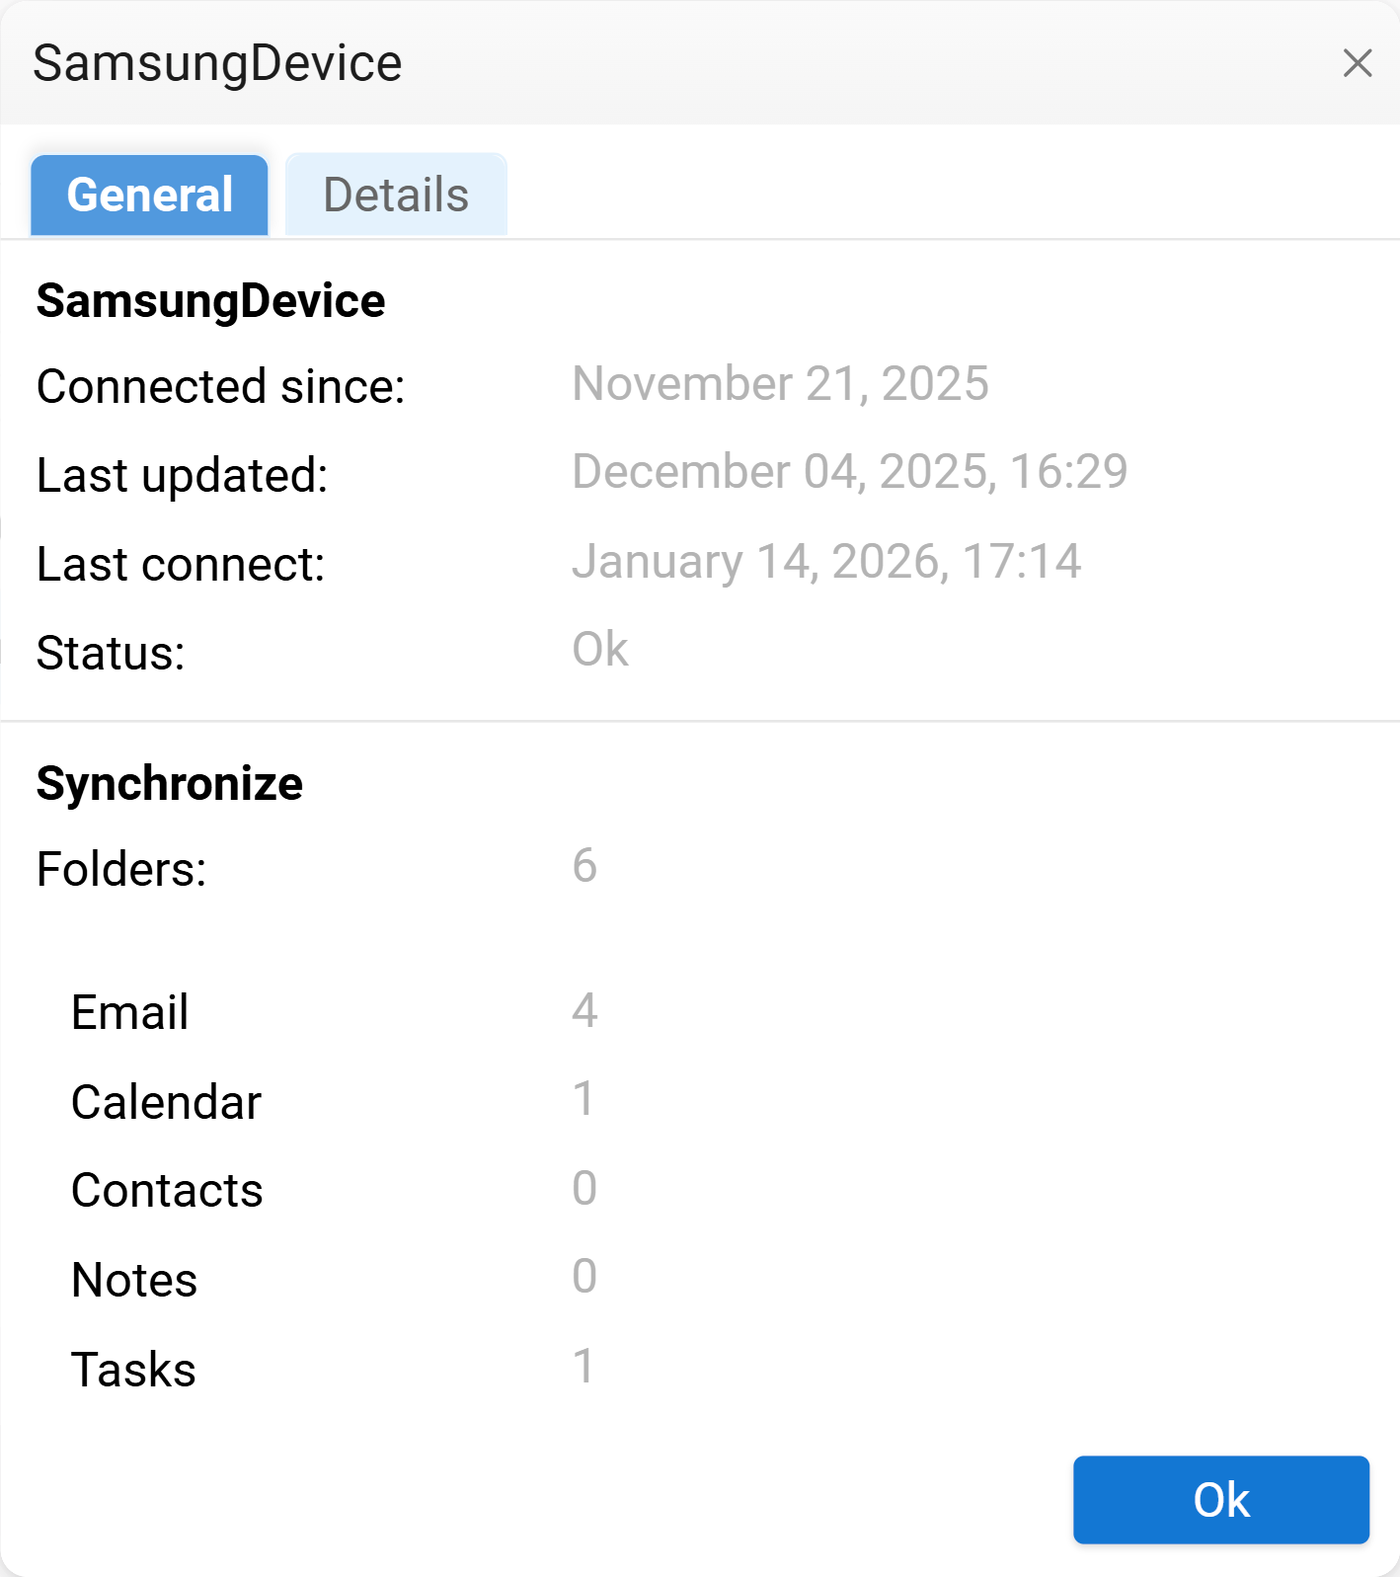
Selecting a device opens a popup window which displays more information about the device: number and types of synchronized folders, grommunio sync version, current ActiveSync protocol version implemented by grommunio sync and current provisioning policy enforced on the device.
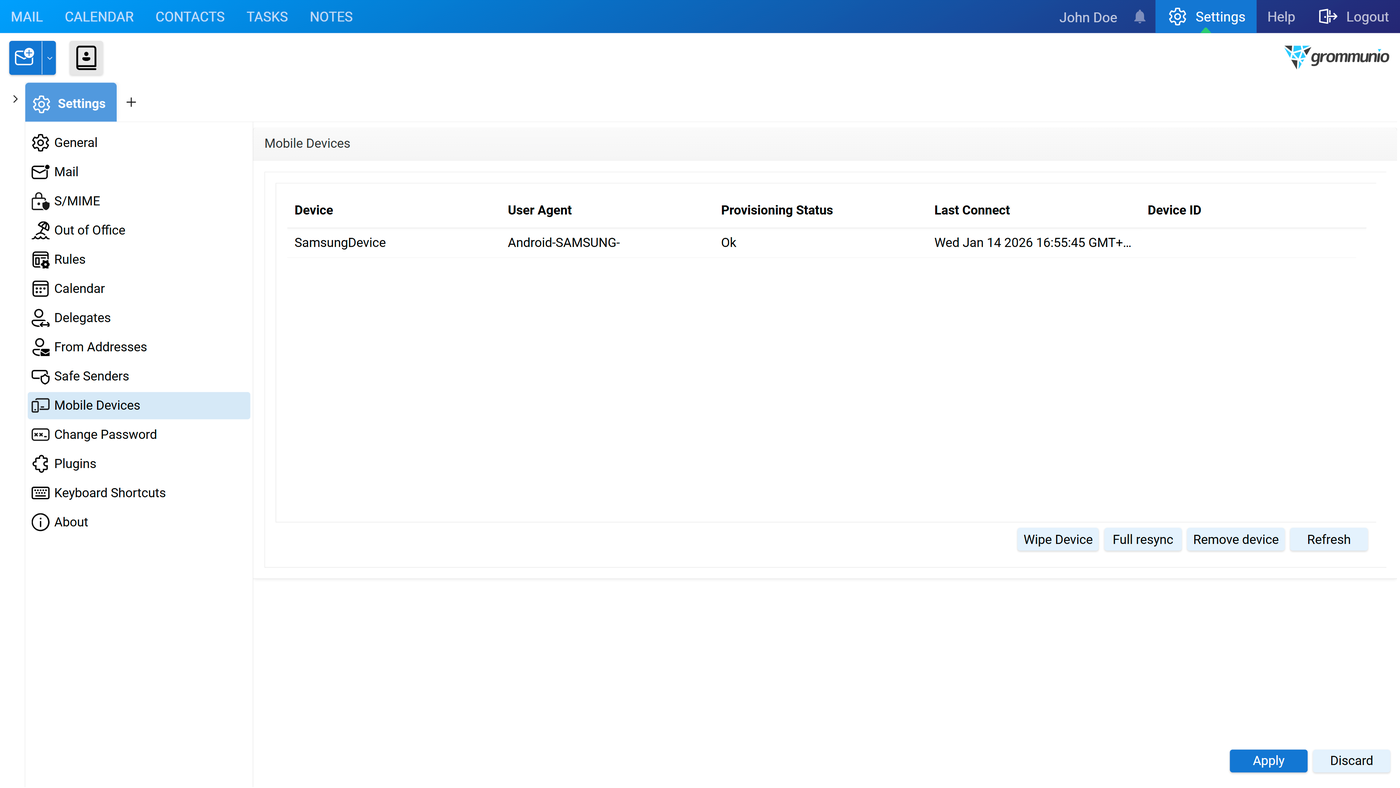
Actions
Section titled “Actions”Wipe Device
Section titled “Wipe Device”This command sets the device status to "pending wipe request". During the next request, the device will acknowledge the request and perform the data wipe. Depending on the vendor implementation, it is possible that the device will reboot after performing this operation. Due to the consequences of this operation, the user must provide his password before issuing the wipe request.
The wipe strategy may also depend on the provisioning policies enforced by the domain administrator. For questions or clarification regarding this operation, contact the domain administrator or grommunio support before performing it.
Full Resync
Section titled “Full Resync”This command marks the device for full grommunio account resync. On the next request, the device will acknowledge the request and perform, at first, the hierarchy and, afterwards, the content sync. Be aware that this process may take some time, especially when handling a large number of items or items with attachments in the grommunio store.
This functionality should be used when synchronization issues occur e.g. some items do not appear on the mobile device.
Remove Device
Section titled “Remove Device”This command will remove the saved device state from the grommunio store and the device will also disappear from the list.
Refresh
Section titled “Refresh”This command refreshes the devices list. If a grommunio account is set up on a new mobile device after opening the MDM plugin, selecting this button retrieves the devices' information from the grommunio store, and the new device will appear in the list.
Change password
Section titled “Change password”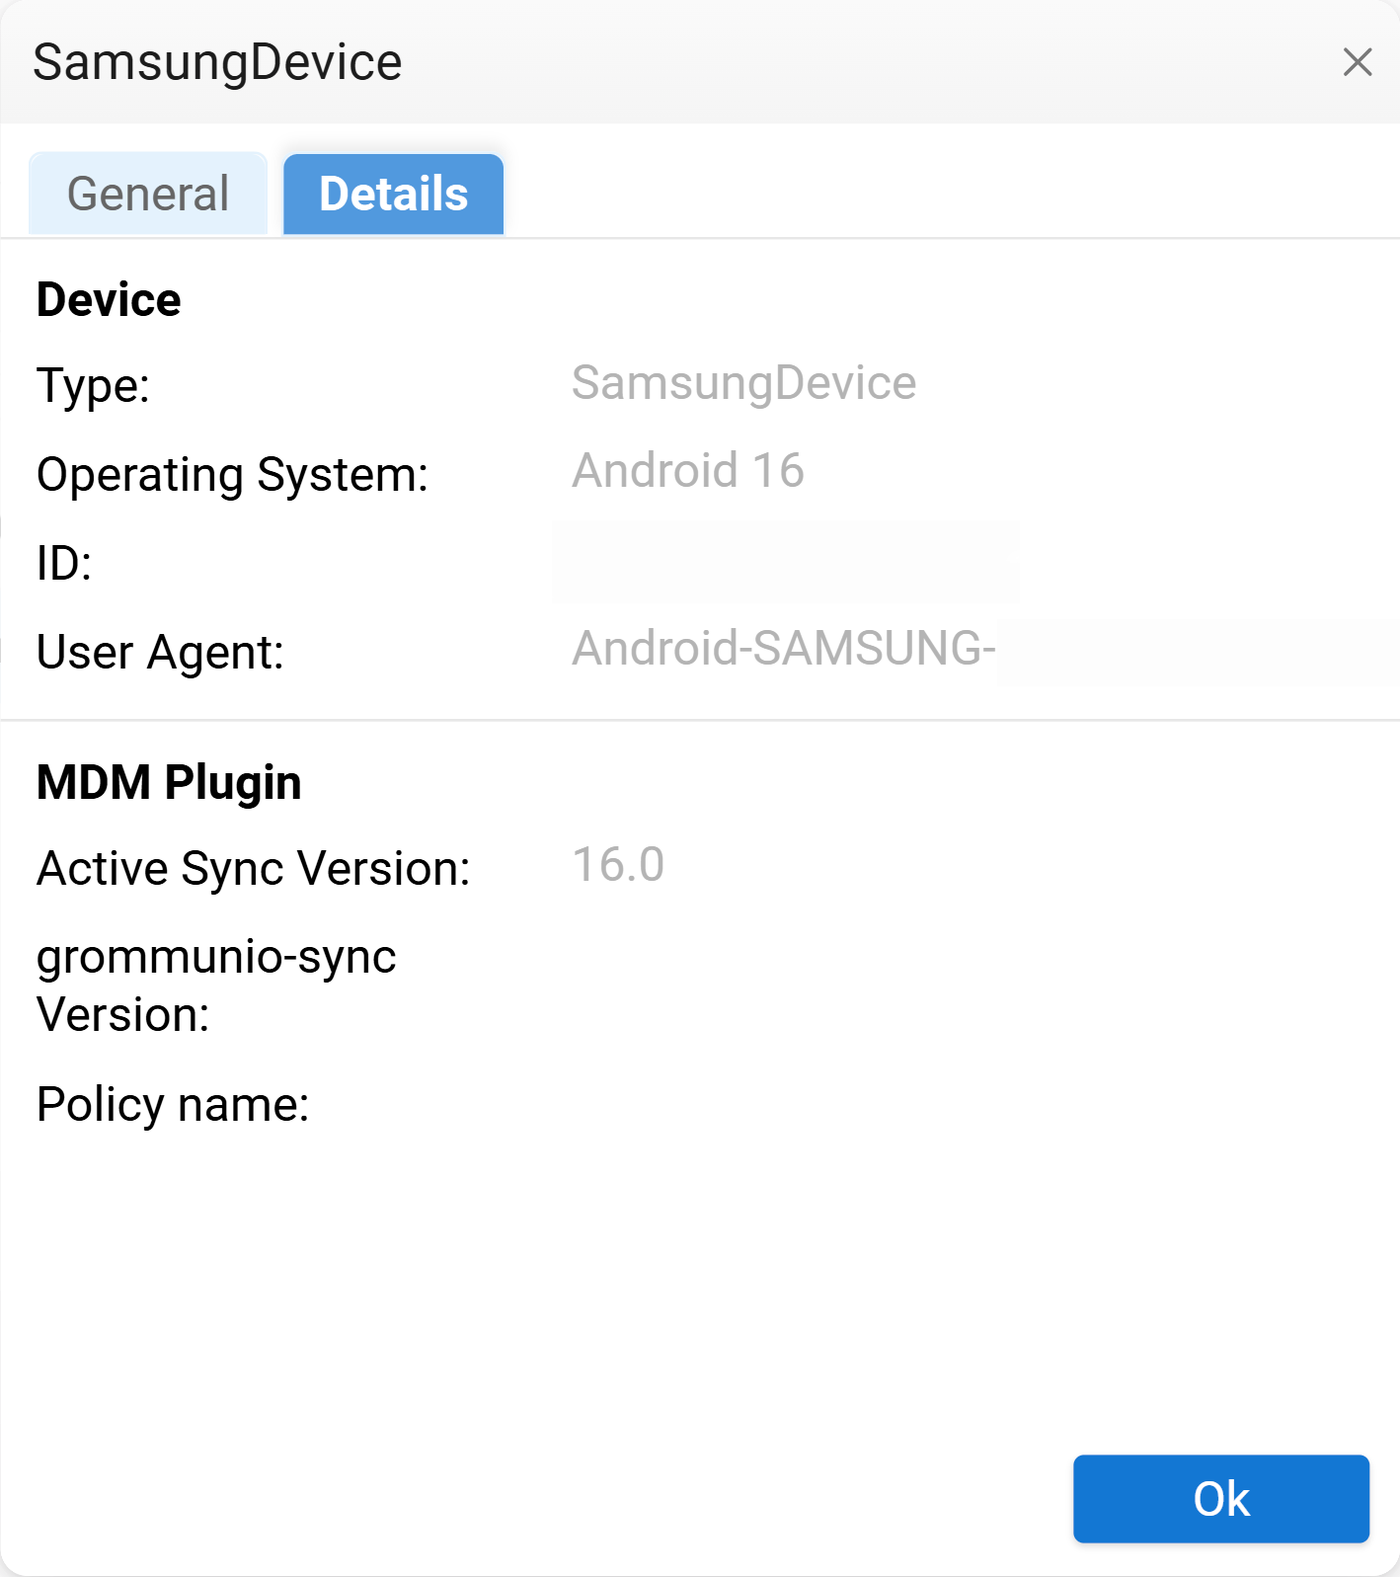
Use this setting to update the account password. Enter the current password, then specify a new password and confirm it. After saving, the new password is required for all future sign-ins.
Plugins
Section titled “Plugins”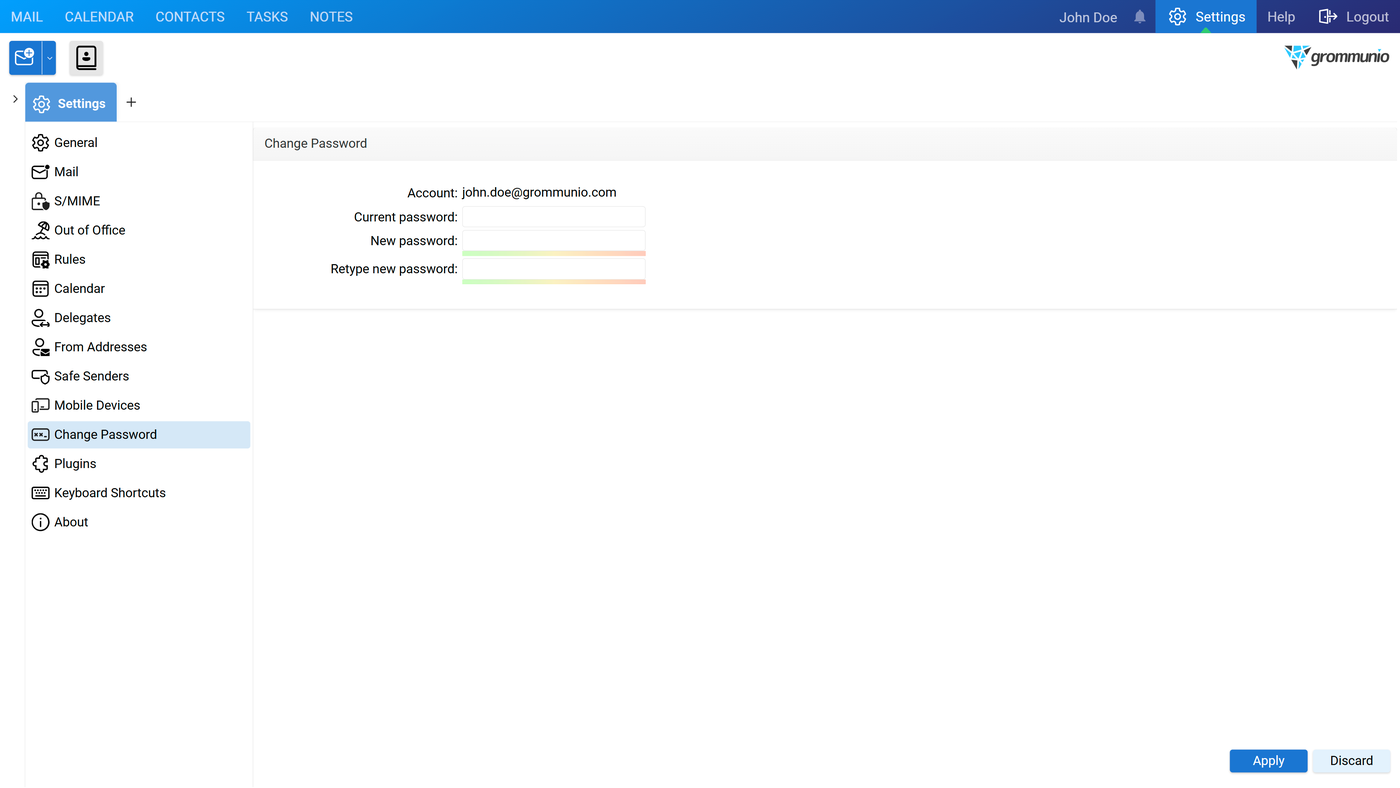
This section displays all available plugins with their name and version. Use this section to enable or disable optional features in the web interface.
Only plugins with a selectable checkbox can be enabled or disabled by the user. Mandatory plugins are required for core functionality and managed by the system administrator.
Keyboard Shortcuts
Section titled “Keyboard Shortcuts”
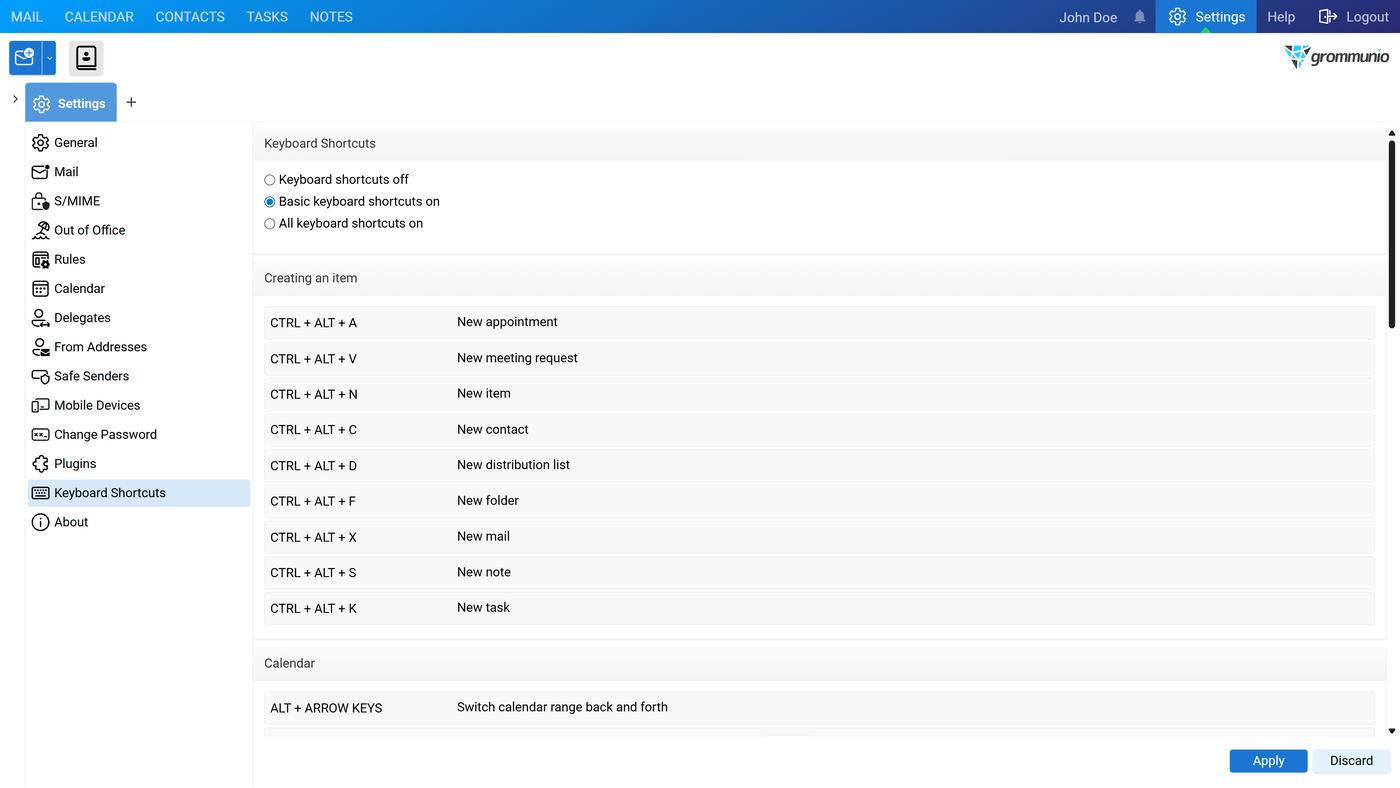
The Keyboard Shortcuts setting provides a complete list of all available keyboard shortcuts together with their corresponding actions. Some shortcuts are marked as BASIC, indicating commonly used and essential functions.
At the top of the page, one of the following options can be selected to control shortcut availability:
- Keyboard shortcuts off – Disables all keyboard shortcuts.
- Basic keyboard shortcuts on – Enables only shortcuts marked as BASIC, providing a minimal and simplified set of shortcuts.
- All keyboard shortcuts on – Enables the full set of available keyboard shortcuts, including advanced and less frequently used actions.
This section provides information about the application, including copyright notices and license details for the software and its components. It is intended for reference and informational purposes only.